
Using GraphHopper For Routing With Data From OpenStreetMap
If you want to do routing in your application (the kind of routing that involves streets, crossings, etc.) you can use for example Googles Direction API. Its quality is unmatched and it is usually a very good solution for a lot of requirements. But there are some downsides. Google allows only a limited amount of requests. It is a WebService, so there is some overhead for all the network stuff going on. And last but not least if you have to send personal information like the addresses of your customers you might be violating the General Data Protection Regulation of the EU. So it might be good to have an alternative. One of those alternatives is GraphHopper. This software and its usage is the subject of this post.
![]()
In one of my recent projects we needed to calculate the distance between an address of a customer and a list of car repair shops. But the distance should not be calculated as the crow flies. Instead we needed to calculate the real distance to actually drive there by car. The exact requirements were:
- Easy to use from a Java application
- Fast calculation: The list of car repair shops could be as long as 20 different ones. The distance to all of those should be calculated in less than 5 seconds.
- No personal information should be sent to a third party because we need to stick to the General Data Protection Regulation of the EU.
- Calculation of the distance as the car drives.
GraphHopper fullfills all this requirements. It’s a routing engine implemented in Java. You can run it embbedded in your Java application. So there is no need to send any information over the network. It’s also extremely fast. It uses data from OpenStreetMap (OSM). Here in Germany the quality of OSM is quite decent. My experiments with it shows it is sufficient for the usecase mentioned above.
Maven
If you are using Maven you can import GraphHopper like this:
<dependency>
     <groupId>com.graphhopper</groupId>
     <artifactId>graphhopper-core</artifactId>
     <version>0.11.0</version>
</dependency>
Initialization
In order to use it you have to create an instance of GraphHopper, configure it and load the data from an OSM file.
GraphHopper graphHopper = new GraphHopper().forServer();
graphHopper.setMemoryMapped();
graphHopper.setDataReaderFile(PATH_TO_OSM_FILE);
graphHopper.setGraphHopperLocation(PATH_TO_GRAPHHOPPER_WORKINGDIR);
graphHopper.setEncodingManager(new EncodingManager(FlagEncoderFactory.CAR));
graphHopper.getCHFactoryDecorator().setWeightingsAsStrings("shortest", "fastest");
graphHopper.clean();
graphHopper.importOrLoad();
The specified working directory must be writable for GraphHopper. On the first start GraphHopper reads the OSM-File and creates some custom indexes in this working directory. Depending on the size of the OSM file you are using this process will take a considerable amount of time and is also quite heavy in resource consumption. Quite some amount of RAM and CPU is needed at that point in time. During subsequent starts GraphHopper uses the existing indexes and thus the startup is way faster.
In the example above indexes are created for the shortest and the fastest routes by car. You have to consider your usecases here. You need to specify all the options for routings that you need later. GraphHopper constructs its indexes accordingly. If you omit for example the “shortest” weighting you can not search for the shortest route later. On the other hand the more things you configure here the longer the initialization will take. You have to do some tradeoffs here. If you want too much, it will take ages to initialize the data. Worst case your application runs out of memory.
Usage
After the instance is created it is ready for some requests:
GHRequest request =
     new GHRequest(startingPointLatitude, startingPointLongitude,
               destinationLatitude, destinationLongitude)
          .setWeighting("fastest")
          .setVehicle("car");

HintsMap hints = request.getHints();
hints.put("instructions", false);
hints.put("calcPoints", false);

GHResponse response = graphHopper.route(request);

if (!response.hasErrors()) {
     double distance = response.getBest().getDistance();
} else {
     ...
}
In the request you need to set the coordinates of your starting point and of your destination. In the example above we also want the fastest route by car.
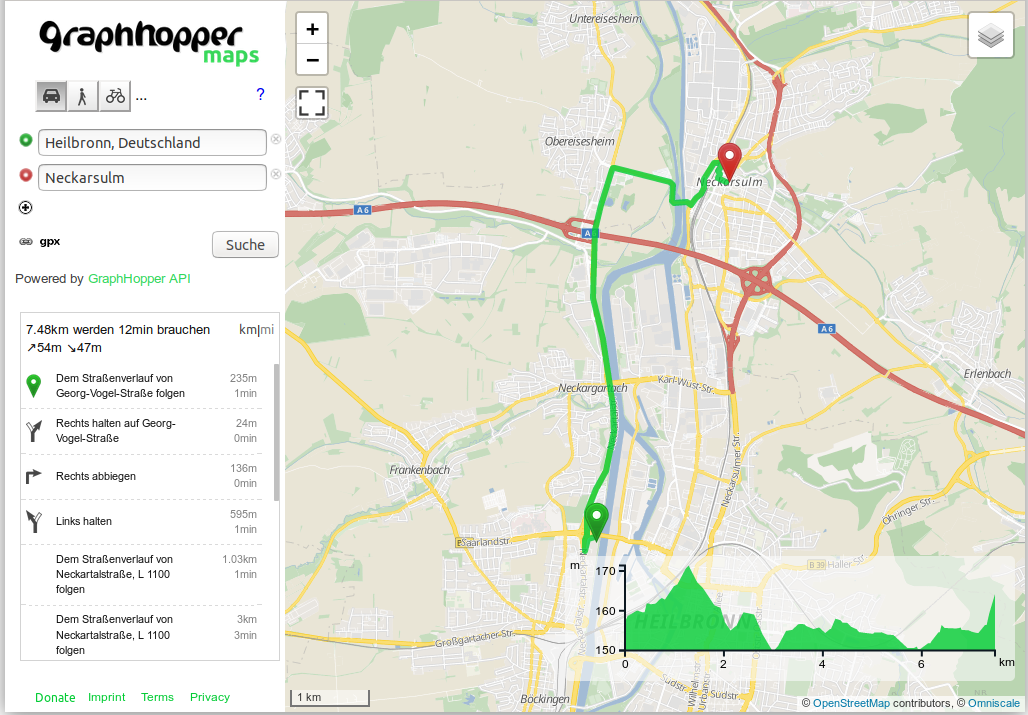
By default GraphHopper’s result contains some meta data for the routing like distance and duration for the route. It also contains a list of instructions (“Turn left into Blabla street”), way points and so on. It provides you with all the information needed to plot results like this for your users:
In our usecase we did not need the full blown result. We were mainly interested in the distance. This is why we added some hints to the request in the example above. It tells GraphHopper to suppress the instructions and the waypoints which speeds up the calculation to some extend.
If you want to test the amazing speed of GraphHopper online you can use the instance at GraphHopper Maps
TL;DR
GraphHopper is a very efficient replacement for the Google Directions API which is written in Java and suitable for self-hosting.